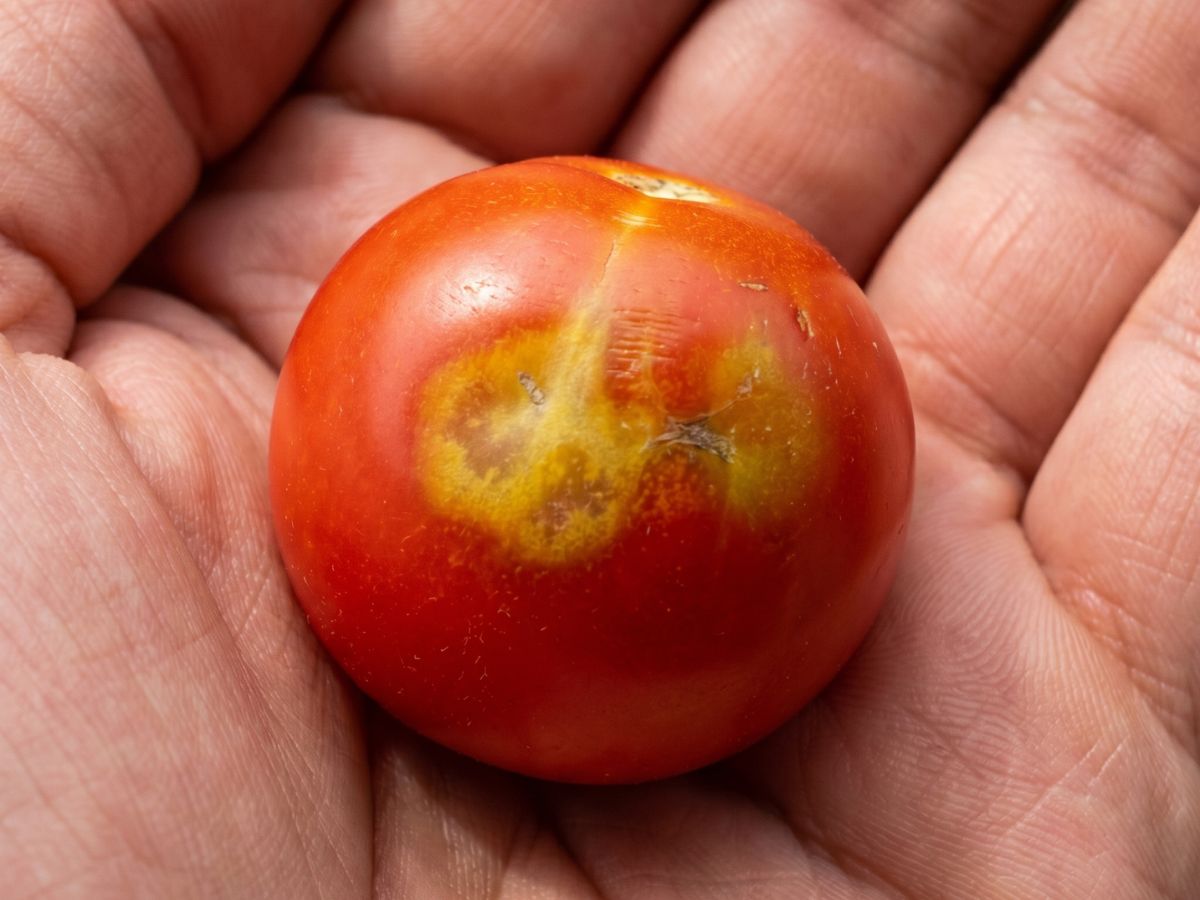
pests & diseases · identification & treatment

Tomato Pests &
Diseases Guide

Identification, prevention, and treatment for every major tomato problem. Covers both ethical and chemical solutions.

Download this Guide

Blossom End Rot

Blossom end rot on tomato fruit
identify it

A dark, sunken, leathery patch on the bottom of the fruit. Starts small and pale, grows into a large black or brown area as the fruit develops. It hits green fruit just as often as ripe. Only affects the fruit, not the leaves or stems.

why it happens

Calcium doesn't reach the developing fruit fast enough. This is almost never a soil deficiency. Calcium travels through the plant via water, so when watering swings between too wet and too dry, the plant can't transport it fast enough to keep up with rapid fruit growth. Overfertilizing with nitrogen or potassium also blocks uptake even when calcium is present in the soil.

treat & prevent
  • Water on a schedule. Tomatoes need about 1 to 2 inches of water per week. Water deeply (at least 6 inches down) every 2 to 3 days rather than a little every day. Shallow daily watering is one of the biggest causes of calcium lockout. A drip line on a timer is the most effective fix.
  • Mulch 2 to 3 inches around the base to hold moisture between waterings and reduce the wet-dry swings that cause the problem.
  • Apply calcium foliar spray directly to the developing fruit and new growth, starting when fruit is marble-sized. Spray every 7 to 10 days through the first 3 fruit clusters. Apply in the morning so it absorbs before the heat of the day.
  • Pull back on nitrogen-heavy fertilizers once plants are fruiting. Too much nitrogen pushes leafy growth and actively competes with calcium uptake at the roots.
  • Affected fruit will not recover. Cut it off, let it go, and focus on stabilizing conditions for the next cluster.
recommended products

Tomato Hornworm

Tomato hornworm caterpillar
identify it

Large sections of leaves disappear overnight. Entire branches get stripped. The hornworm itself is bright green with white diagonal stripes and a prominent horn at its rear , up to 5 inches long. Dark green droppings on the soil below are the easiest early signal. Use a UV flashlight at night , they glow bright green.

why it happens

The adult sphinx moth lays eggs on the undersides of tomato leaves in late spring. Each egg hatches into a caterpillar that feeds nonstop for 3–4 weeks. Gardens near woodlines or without row cover protection are most exposed. They arrive in waves , typically one generation in early summer, sometimes another in late summer.

treat & prevent
  • Hand-pick at night with a UV flashlight , they glow and are easy to find. Drop into soapy water.
  • Apply Bt (Bacillus thuringiensis) spray , a biological control that kills caterpillars and nothing else. Most effective on young hornworms.
  • If you see white rice-like projections on the hornworm's back, leave it , those are parasitic wasp eggs doing the work for you.
  • If you want to complete the life cycle, you can feed these highly nutritious, protein-rich hornworms to chickens. Do not toss the tomato leaves in with them , tomato leaves are toxic to chickens.
recommended products

Aphids

Aphids on tomato plant
identify it

Clusters of tiny, pear-shaped insects on new growth and leaf undersides. Can be green, yellow, black, or white. Leaves may curl or look distorted. A sticky residue on leaves (honeydew) is a reliable sign , sometimes followed by sooty black mold growing on it.

why it happens

Aphids reproduce asexually , a single aphid can produce dozens of offspring in a week. They're drawn to lush, nitrogen-rich new growth. Overfertilized plants are bigger targets. They also spread plant viruses as they feed, which makes early control more important than the colony size suggests.

treat & prevent
  • A hard blast of water knocks them off. Focus on undersides of leaves. Repeat every few days until the colony is gone.
  • Insecticidal soap spray kills on contact. Coat stems and undersides thoroughly. Reapply after rain.
  • Neem oil works as both a contact killer and a repellent. Apply in the evening to avoid burning the leaves.
  • Encourage ladybugs and lacewings. They're natural predators and will clean up a colony fast.
recommended products

Want this as a printable guide?

Get the PDF version delivered to your inbox — free.

Download this Guide

Tomato Fruit Worm

Tomato fruit worm damage
identify it

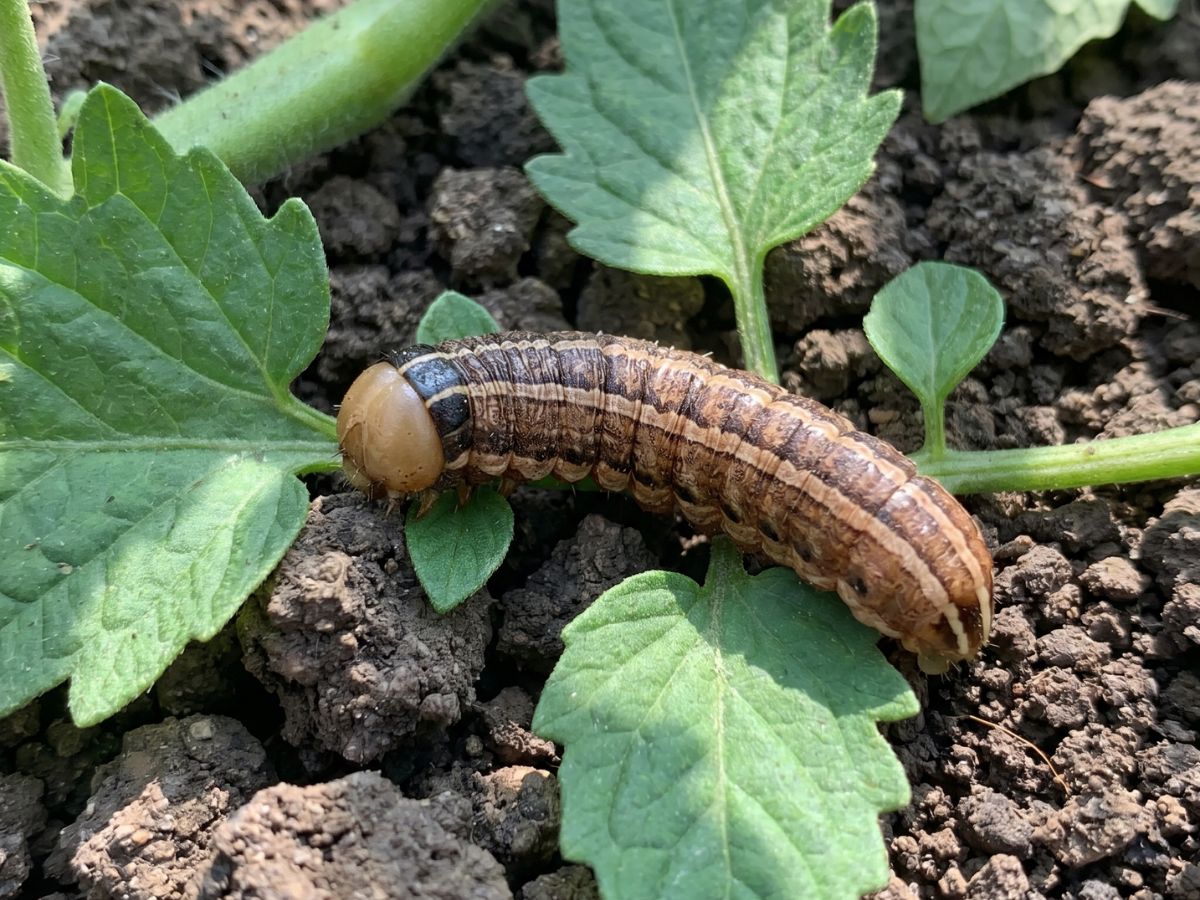
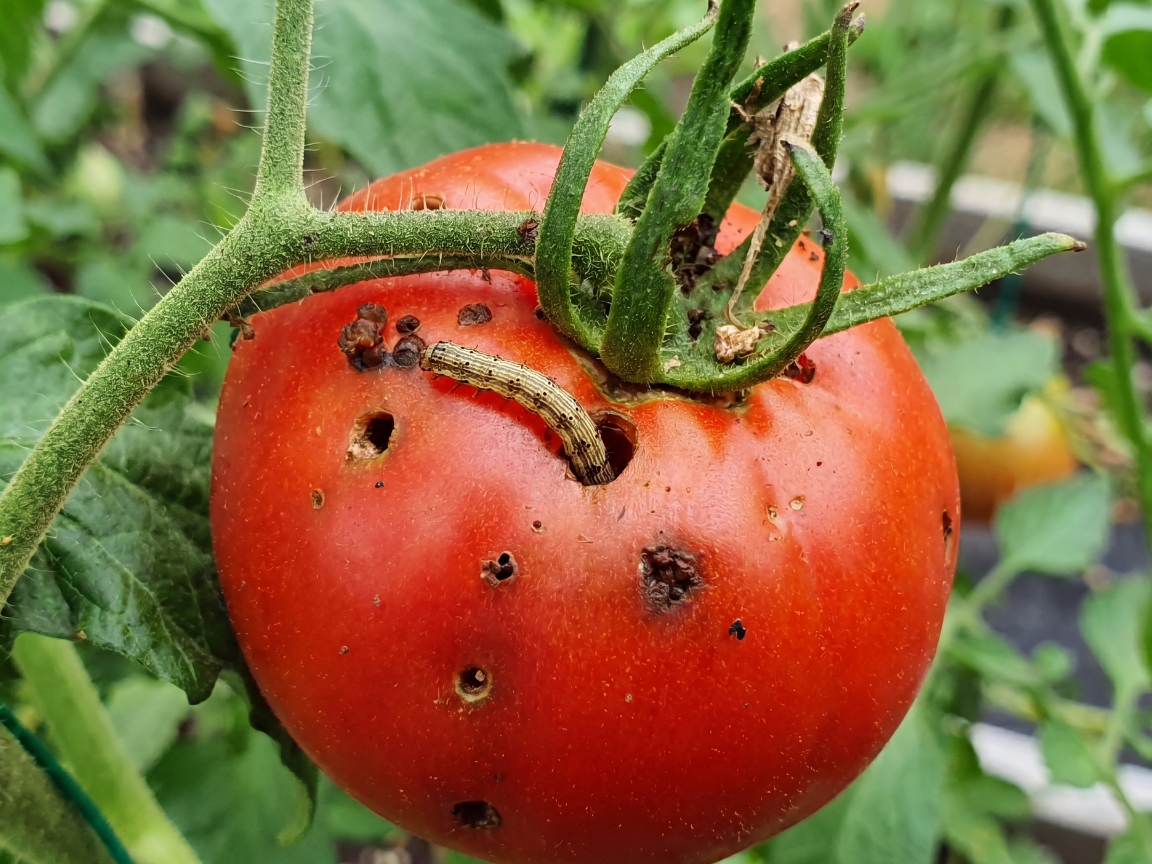
Deep, irregular holes bored into ripening fruit , often at the stem end. The inside is hollowed and filled with dark frass. The caterpillar is yellowish-brown with dark stripes and is usually found inside the fruit. Small, dark entry holes are the first sign , probe inside and you'll find tunneling in the flesh.

why it happens

The tomato fruit worm moth lays eggs on leaves and developing fruit in early summer. Larvae hatch and immediately burrow in, where they're protected from sprays. One larvae per fruit is typical , they're territorial. Warm, dry summers and adjacent corn crops increase pressure significantly.

treat & prevent
  • Monitor with pheromone traps , catching the adult moth population before egg-laying is the most effective control window.
  • Apply Bt or spinosad to foliage before larvae enter fruit. Once inside, sprays can't reach them.
  • Remove and destroy infested fruit immediately , don't compost. It breaks the cycle.
  • Row covers during early season prevent moths from reaching plants to lay eggs.
recommended products

Bacterial Spot

Bacterial spot on tomato
identify it

Small, dark, water-soaked spots on leaves surrounded by a yellow border. Centers dry out and fall away, leaving jagged holes. On fruit: small, raised, dark brown spots with a waxy white border , concentrated on the shoulders of green fruit. Stems and calyx may also show brown spotting.

why it happens

Caused by a bacterium that thrives in warm (75–86°F), wet conditions. It spreads rapidly via rain splash, overhead irrigation, and handling wet plants. It can survive on infected seed and plant debris in the soil , which is why it tends to reappear in the same bed year after year.

treat & prevent
  • Switch to drip irrigation , overhead watering is the primary spreader in the garden.
  • Apply copper-based bactericide at the first sign. It won't cure existing infection but slows the spread.
  • Remove and bag infected leaves immediately. Wash hands before touching other plants.
  • Rotate crops , don't grow tomatoes or peppers in the same spot for at least two seasons.
recommended products

Gray Mold

Gray mold on tomato leafGray mold on tomato fruit
identify it

Gray-green spots on leaves that develop a fuzzy gray bloom , that's the mold sporulating. Leaves dry up and die. On stems, look for a brown, water-soaked lesion, especially near the soil or at a pruning cut. The fuzzy gray coating is the giveaway , nothing else looks quite like it.

why it happens

Botrytis cinerea lives on dead plant matter and becomes a parasite when humidity stays high (above 90%) and temperatures are cool (60–75°F). It enters through wounds, dead flower petals, or damaged tissue. Dense plantings with no pruning create the exact microclimate it needs.

treat & prevent
  • Improve airflow immediately , prune lower leaves and crowded branches. This is the most effective single step.
  • Remove all infected tissue and don't leave pruned material on the soil , it becomes a new infection source.
  • Water at the base, early in the day so foliage dries completely before nightfall.
  • Apply copper or chlorothalonil fungicide if spreading , alternate products to prevent resistance buildup.
recommended products

Powdery Mildew

Powdery mildew on tomato leaves
identify it

White or light gray powdery coating on the upper surface of leaves , starts as circular spots and spreads to cover entire leaves. Yellow spots may appear alongside. Heavily infected leaves brown and drop. Unlike most fungal diseases, it thrives in warm, dry conditions , it doesn't need wet leaves to spread.

why it happens

Fungal spores spread through the air , wind, insects, and clothing all carry them. Warm days followed by cool nights create ideal conditions. Dense plantings and over-fertilizing with nitrogen both increase susceptibility. Older, lower leaves are typically hit first.

treat & prevent
  • Remove infected leaves immediately , don't compost. Reduces the spore load in the garden.
  • Apply potassium bicarbonate spray at first sign. Coat all leaf surfaces including undersides.
  • Sulfur-based fungicides are highly effective and preventative , apply before the infection reaches the upper canopy.
  • Improve spacing and airflow , powdery mildew struggles to establish where air circulates freely.
recommended products

Bacterial Wilt

bacterial-wilt
what it is

Bacterial wilt is caused by Ralstonia solanacearum, a soilborne bacterium that invades the plant's water-conducting vessels and produces a slime that blocks water uptake. Plants wilt rapidly — often a single branch first, then the whole plant within days. Unlike other wilting diseases, bacterial wilt moves fast and is always fatal. There is no cure once a plant is infected.

identify it

The classic test: cut a wilted stem near the base and hold the two ends close together in a glass of water. If thin, white, thread-like bacterial strands stretch between the cut ends, it's bacterial wilt. Leaves wilt suddenly during the heat of the day but may appear to recover overnight in early stages. The collapse accelerates quickly.

The bacteria is primarily spread by cucumber beetles feeding on infected plants and then moving to healthy ones. It also spreads through contaminated soil, water, and tools.

treat & prevent
  • Remove and destroy infected plants immediately. Do not compost — bag and discard. Every day you wait risks spreading to neighboring plants.
  • Disinfect any tools that touched the infected plant with a 10% bleach solution or 70% isopropyl alcohol.
  • Control cucumber beetles aggressively — they are the primary vector. Yellow sticky traps, row covers early in the season, and neem oil all help reduce pressure.
  • Do not replant tomatoes, peppers, or eggplants in that spot for at least 2 to 3 years. The bacteria can persist in soil.
  • Choose resistant varieties where available. Look for "BW" resistance codes on seed packets.
recommended products

Early Blight

early-blight
what it is

Early blight is caused by the fungus Alternaria solani. It starts on the oldest, lowest leaves and works its way up the plant. The telltale sign is dark brown spots with concentric rings — like a bullseye or target — surrounded by a yellow halo. It weakens the plant over time but rarely kills it outright. Most common in warm, humid conditions.

identify it

Look for dark brown circular spots with clearly defined rings on lower leaves first. The surrounding leaf tissue turns yellow. As it progresses, affected leaves drop off, exposing fruit to sunscald. Stems can develop dark, sunken lesions at the soil line — a condition called collar rot.

treat & prevent
  • Remove affected leaves immediately and dispose of them — do not compost.
  • Apply copper fungicide or chlorothalonil as a preventative spray, especially before rainy periods. Reapply every 7 to 10 days.
  • Mulch heavily around the base of plants to prevent soil splash, which spreads fungal spores to lower leaves.
  • Water at the base only — never overhead. Wet foliage accelerates spread dramatically.
  • Improve airflow by removing suckers and lower leaves. Crowded plants get early blight faster.
  • Rotate crops — do not plant tomatoes in the same spot two years in a row.
recommended products

Late Blight

late-blight
what it is

Late blight is caused by Phytophthora infestans — an oomycete (water mold) that thrives in cool, wet conditions. Unlike early blight, late blight spreads with terrifying speed and can kill an entire plant in 3 to 5 days under the right conditions. It spreads through the air as spores and can travel miles from infected plants.

identify it

Look for irregularly shaped, water-soaked dark lesions on leaves and stems — often with a white, fuzzy mold on the underside of leaves in humid conditions. Lesions are not circular like early blight; they look more like bruised, greasy patches. Fruit develops firm, dark, greasy-looking brown rot. The smell is distinctive — slightly rotten.

treat & prevent
  • Act immediately. Late blight spreads faster than any other tomato disease. Every hour matters.
  • Remove and bag all infected plant material. Do not compost under any circumstances. Bag and put in the trash.
  • Apply copper fungicide immediately to all remaining plants as a protective barrier. It won't cure infected tissue but slows spread.
  • If the infection is advanced, remove the entire plant. Leaving it risks your entire garden and your neighbors' too.
  • Never water overhead. Avoid working in the garden when plants are wet.
  • In future seasons, choose blight-resistant varieties. Look for "Ph" resistance codes.
recommended products

Septoria Leaf Spot

septoria-leaf-spot
what it is

Septoria leaf spot is caused by Septoria lycopersici, a fungus that appears shortly after the first fruits set. It starts on the lowest leaves and moves upward rapidly. Left unmanaged it can defoliate an entire plant by midsummer, leaving fruit exposed and yields dramatically reduced.

identify it

Spots are small, circular, and numerous — typically an eighth of an inch in diameter. They have a dark brown border with a tan or gray center. Look closely and you can see tiny black specks in the center of each spot — these are the fungal fruiting bodies. This is the key difference from early blight, which has larger spots with concentric rings.

treat & prevent
  • Remove affected leaves as soon as you spot them. Start from the bottom up.
  • Apply copper fungicide every 7 to 10 days as a preventative and to slow spread.
  • Mulch around the base — spores overwinter in soil and splash up onto lower leaves.
  • Space plants properly and prune for airflow. Septoria thrives in humid, crowded conditions.
  • Rotate crops annually. The fungus overwinters in infected plant debris in the soil.
recommended products

Tobacco Mosaic Virus

tobacco-mosaic-virus
what it is

Tobacco Mosaic Virus (TMV) is one of the most resilient plant viruses known. It can survive on dried plant material, tools, clothing, and even in cigarette tobacco for years. It spreads through mechanical contact — touching an infected plant then touching a healthy one. There is no treatment. Infected plants must be removed.

identify it

The classic sign is a mosaic-like mottling of the leaves — patches of light green, yellow, and dark green in an irregular pattern. Leaves may also look blistered, curled, or distorted. Young leaves are often narrower than normal and may have a fernlike, stringy appearance called "shoestring." Fruit may show yellow rings or internal browning.

If you smoke: wash your hands thoroughly with soap before touching tomato plants. Cigarette tobacco frequently carries TMV.

treat & prevent
  • Remove and bag infected plants immediately. Do not compost.
  • Sterilize all tools with 10% bleach solution or 70% isopropyl alcohol after contact with any infected plant.
  • Wash hands and change clothes before moving from infected areas to healthy plants.
  • Control aphids — they can transmit TMV mechanically as they move between plants.
  • Choose TMV-resistant varieties. Look for "T" or "TMV" in resistance codes on seed packets.
  • Do not save seeds from infected plants.
recommended products

Spider Mites

spider-mites
what it is

Spider mites are not insects — they are arachnids, closely related to spiders. They are barely visible to the naked eye and live on the undersides of leaves, piercing plant cells and sucking out the contents. A single female can lay hundreds of eggs and a colony can explode in days during hot, dry weather. They thrive when plants are stressed.

identify it

Look for stippling — tiny yellow or white dots scattered across the upper leaf surface where mites have fed. Leaves may look dusty, bronzed, or washed out. Check the underside of leaves for fine webbing and tiny moving dots. The webbing is the giveaway. Shake a leaf over white paper — if tiny specks move, you have mites.

treat & prevent
  • Spray plants forcefully with water — a strong stream from the hose dislodges mites from leaves. Do this in the morning so plants dry quickly.
  • Apply neem oil or insecticidal soap to the undersides of leaves. Repeat every 5 to 7 days for 3 cycles.
  • Keep plants well-watered — stressed, drought-stricken plants attract spider mites. Consistent moisture is your best defense.
  • Introduce predatory mites (available online) for severe infestations. They eat spider mites and don't harm plants.
  • Avoid broad-spectrum pesticides — they kill the natural predators that keep mite populations in check.
recommended products

Whiteflies

whiteflies
what it is

Whiteflies are tiny, white-winged insects that cluster on the undersides of leaves and feed by sucking plant sap. They excrete a sticky substance called honeydew that coats leaves and encourages black sooty mold to grow. Heavy infestations weaken plants, cause leaf yellowing and drop, and can transmit viruses between plants.

identify it

Gently shake or brush against the plant — whiteflies take flight in a visible white cloud when disturbed. Check the undersides of leaves for clusters of tiny white insects and their pale, scale-like eggs and nymphs. Leaves may appear yellowed, sticky, or coated with black sooty mold from their honeydew deposits.

treat & prevent
  • Use yellow sticky traps to monitor and catch adults. Hang them near plants at leaf level.
  • Spray the undersides of leaves with insecticidal soap or neem oil. Coverage of the underside is critical — that's where they live.
  • Introduce beneficial insects like parasitic wasps (Encarsia formosa) for greenhouse situations.
  • Remove heavily infested leaves to reduce the population quickly.
  • Avoid over-fertilizing with nitrogen — lush, soft growth attracts whiteflies.
recommended products

Cutworms

cutworms
cutworms
what it is

Cutworms are the larvae of various moth species. They live in the soil and emerge at night to feed, cutting through seedling stems at or just below the soil line. A cutworm can sever an entire transplant in a single night. They are most destructive right after transplanting when stems are young and tender.

identify it

You won't see them — they hide in the soil during the day. What you'll see is a severed seedling, cut cleanly at the base, lying on the ground. Dig an inch or two into the soil around the base of cut plants and you'll often find a fat, gray or brown caterpillar curled in a C-shape. That's your culprit.

treat & prevent
  • Place a physical collar around each transplant at planting time. A toilet paper roll, a cut plastic cup, or a strip of cardboard pushed 2 inches into the soil works perfectly.
  • Apply Bt (Bacillus thuringiensis) to the soil surface around plants. Cutworms ingest it and die within days.
  • Sprinkle diatomaceous earth around the base of each plant. The sharp particles damage the cutworm's soft body.
  • Till the soil a week before planting to expose pupae to birds and sunlight.
  • Hand-pick at night with a flashlight — cutworms feed after dark and are easy to spot and remove.
recommended products

Stink Bugs

stink-bugs
stink-bugs
what it is

The brown marmorated stink bug (BMSB) is an invasive species from Asia now found in nearly every US state. Shield-shaped, mottled brown, and about the size of a dime. They feed by piercing fruit with needle-like mouthparts and injecting digestive enzymes — essentially liquefying the flesh inside before sucking it out. The damage isn't obvious from the outside, which is what makes them so frustrating.

identify it

On the outside: look for tiny yellow or white pinprick marks on the fruit surface, often near the stem end. Surrounding tissue may turn yellow or stay pale green on ripe fruit. Cut the tomato open and you'll find dry, spongy, pale, or corky areas just under the skin — that's the real damage. Heavily infested fruit may show cloudiness throughout. Shake a plant over white paper and watch for the bugs to drop. They're there — they're just good at hiding.

treat & prevent
  • Hand-pick adults and egg masses in the morning when they're slow. Drop them in soapy water. It's tedious but effective at small scale.
  • Install yellow sticky traps around the perimeter of your garden to monitor population levels.
  • Use kaolin clay spray on developing fruit — it creates a physical barrier the bugs can't pierce through easily.
  • Row covers over young plants prevent access before fruit sets. Remove when flowers need pollination.
  • Remove weeds around the garden border — stink bugs overwinter in weedy debris and move into gardens in summer.
  • Harvest fruit at first color break and ripen indoors. Fully ripe fruit on the vine is most vulnerable.
recommended products

Fusarium Wilt

fusarium-wilt
what it is

Fusarium wilt is caused by the soilborne fungus Fusarium oxysporum f. sp. lycopersici. It enters through the roots, invades the plant's water-conducting vessels, and blocks water uptake from the inside. Once infected, a plant cannot be saved. The fungus can survive in the soil for up to 10 years without a host — which is why crop rotation matters so much.

identify it

The classic sign is one-sided wilting — only half the plant, one branch, or even one side of a leaf turns yellow and wilts while the other side looks fine. This asymmetry is the key diagnostic clue. Lower leaves yellow first. The plant may appear to recover overnight early in the infection but eventually collapses entirely. Cut the stem near the base lengthwise — you'll see brown streaking in the vascular tissue just under the outer layer. The pith (center) stays white.

treat & prevent
  • Remove infected plants immediately and bag them. Do not compost.
  • Do not plant tomatoes, peppers, or eggplant in that soil for at least 3 years. The fungus persists for up to a decade.
  • Choose resistant varieties — look for "F" (race 1), "FF" (races 1 and 2), or "FFF" (races 1, 2, and 3) on seed packets. This is the most effective prevention available.
  • Raise soil pH to 6.5–7.0 — Fusarium thrives in acidic conditions. A soil test and lime application can make a significant difference.
  • Avoid wounding roots during cultivation. The fungus enters through root wounds.
  • Consider grafted tomatoes for beds with known Fusarium history — disease-resistant rootstocks are highly effective.
recommended products